Printer Features
First-time setup
The first time you open Fluidd (or Mainsail, or look at the touchscreen) after installing OpenCreator, a dialog welcomes you and asks four questions:
- Pressure advance calibration: measure each tool's pressure advance over the purge bucket at the start of every print.
- Purging: purge each tool into the bucket at the start of every print.
- Clog Detection: pause the print when a tool's filament wheel stops turning while filament is still loaded in it. Off by default.
- Bed heat soak: before a fresh bed mesh, wait a few minutes at bed temperature so the plate finishes warping first. Off by default.
Then it says where your tool offsets and dock positions come from and how to recalibrate them, and recommends recalibrating VFA compensation once.
There's nothing you have to calibrate first: a first install on the printer (SoC) takes
your printer's own calibration from FlashForge's config (/usr/data/config/printer.cfg), so it
starts with the input shaper and the PID tuning of all four hotends and the bed
that FlashForge measured. The bed mesh isn't taken; OpenCreator measures its
own. A reinstall or update keeps the config you already have. Tunneled
installs start with the template's values, so calibrate those yourself.
To calibrate yourself anyway: CALIBRATE_INPUT_SHAPER (or
CALIBRATE_INPUT_SHAPER_GRAPH for graphs too),
VFA_COMPENSATION, and C5_PID_CALIBRATE TOOL=1 TARGET=250 for a heater (add
TOLERANCE=0.1 if a noisy heater won't settle; the default is 0.05).
One calibration we do recommend running once, when you're ready: VFA compensation. OpenCreator's VFA calibration is much better than stock's, and the dialog has a page saying so.
The next page explains when to run the two other calibrations:
C5_CALIBRATE_OFFSETS if the tools' offsets weren't right on the stock
firmware either, and C5_CALIBRATE_TOOL_POSITION if a tool doesn't dock or
pick up cleanly.
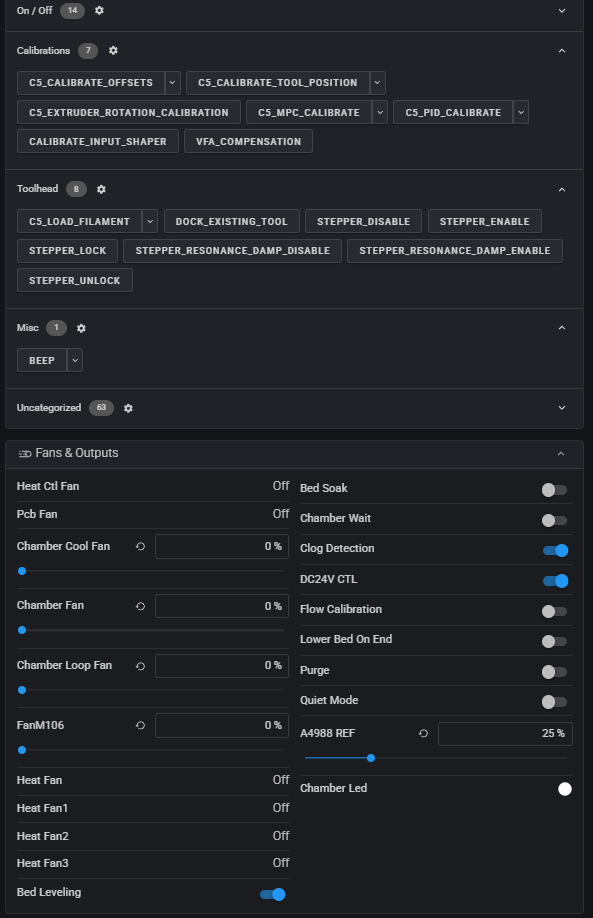
Fluidd also starts with the OpenCreator macro layout: the macros grouped into On / Off, Calibrations, Toolhead and Misc. A layout you already set up in Fluidd is kept.
If you close the dialog before finishing, it comes back within a minute. Once
you reach the last page it won't appear again. Both choices are ordinary
switches under Fans & Outputs, so you can change them at any time. To go
through the dialog again, send C5_FIRST_SETUP in the console.
Camera streamer (experimental option)
The camera streams with mjpg_streamer by default. ustreamer is available as an experimental alternative. It passes the camera's own MJPEG frames through with almost no CPU, copes better with several viewers or a slow connection, and skips repeated frames when nothing moves.
To switch, edit camera.conf in the config folder (Fluidd or Mainsail: Configuration),
then restart the printer:
Switching to ustreamer needs Wi-Fi.
streamer: mjpg_streamer switches back. The camera keeps the same port, addresses
and colour settings, so Fluidd, Mainsail and Timelapse need no changes. If ustreamer
stops three times in a row within 30 seconds of starting, the printer goes back to
mjpg_streamer until the next restart, and says so in /tmp/opencreator.log.
ustreamer's own log is /usr/data/logs/ustreamer.log.
Screen timeout
The touchscreen's backlight turns off after 5 minutes without a touch, and on again at the next touch. That waking touch doesn't press anything. A keyboard or gamepad on the printer's USB keeps it on too, and so does Sonic Mania or DOOM while you play.
To change the time, edit screen-timeout.conf in the config folder from
Fluidd or Mainsail: timeout: 300 is in seconds, and 0 keeps the screen on.
The change takes effect within a few seconds.
It runs as its own small service beside the screen app, so it works with GrumpyScreen and HelixScreen alike.
Timelapse
The OpenCreator Installer sets up Moonraker Timelapse. It takes a camera frame at every layer change and renders them into an MP4 when the print finishes. The videos show up under Timelapse in Fluidd and Mainsail, where you can also change its settings (frame rate, parking the toolhead for each frame, and so on).
To record a print, add TIMELAPSE_TAKE_FRAME to the slicer's layer change
G-code (see Slicer Configuration). Without it,
only hyperlapse mode records, which takes frames at a fixed interval instead.
| Printer (SoC) | Raspberry Pi (tunnel) | |
|---|---|---|
| Camera | The printer camera, through its snapshot URL | The webcam you set up in Fluidd or Mainsail |
| ffmpeg | FlashForge's own build, already on the printer | Installed from apt |
| Frames | /usr/data/opencreator/timelapse/frames/ |
/tmp/timelapse/ |
| Videos | /usr/data/opencreator/timelapse/ |
~/printer_data/timelapse/ |
Rendering on the printer
On the printer, ffmpeg runs at the lowest priority so it never holds up
Klipper, which makes rendering slow: expect a few minutes for a long print.
Frames are kept on storage rather than in /tmp, which is RAM and too
small for a long print.
Moonraker's update manager keeps Timelapse current, as the timelapse entry.
Input shaper graphs
CALIBRATE_INPUT_SHAPER_GRAPH does the same as CALIBRATE_INPUT_SHAPER
(measures both axes, applies the recommended shaper and saves it; add SAVE=0
to save later), and also draws a graph of each axis on the printer, the same
graph Klipper's calibrate_shaper.py makes on a PC. It is under
Calibrations on Fluidd's Macros card (Uncategorized on installs whose
macro layout is older than the macro).
The graphs are saved to the config folder as input_shaper/shaper_x.png and
input_shaper/shaper_y.png; open them from the config files in Fluidd or
Mainsail.
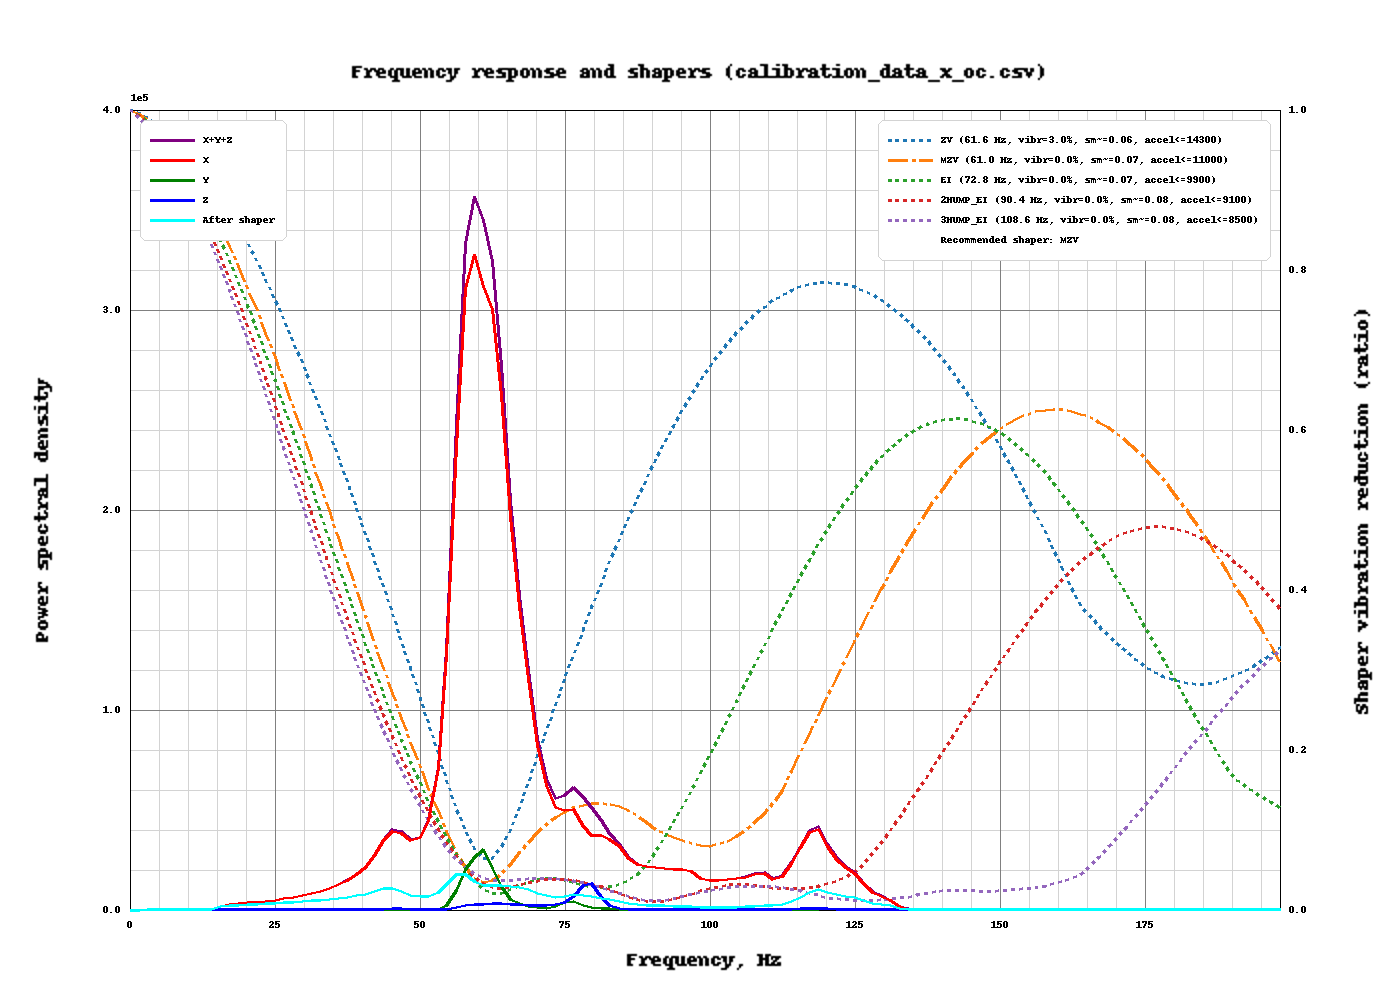
- Left axis: the measured vibrations (X, Y, Z and their sum) at each frequency. Peaks are resonances; After shaper is what the recommended shaper leaves of them.
- Right axis: how much each shaper lets through at each frequency. The recommended shaper is dash-dotted; the legend gives each one's frequency, remaining vibrations, smoothing and the highest acceleration it suits.
The figures come from Kalico's own shaper code, so they match what
SHAPER_CALIBRATE reports in the console.
Flow Calibration in the Creator 5 factory firmware
The touchscreen calls this Flow Calibration, but the routine is intended
to test pressure advance. It does not measure a printed line's width, weigh
extruded plastic, or calculate an extrusion multiplier. The host tries several
pressure-advance values while the eboard observes the extruder motor driver's
SG_RESULT load signal. The eboard reports whether each sampled waveform
passes its check.
The sequence below is reconstructed from the factory firmwareExe.i64
database, principally BuildPage::clearNozzlePrint and
CommMgr::paTestMgr, and from the factory eBoard.hex.
The stock test, step by step
- The host resets the extruder position with
G92 E0, switches to relative extrusion withM83, sets acceleration to 5000 mm/s² and square-corner velocity to 9 mm/s, enables the X/Y motor-driver control pins, and waits for queued motion to finish. - It tries these pressure-advance candidates in this order:
0.0100,0.0200,0.0150,0.0350,0.0250,0.0300, and0.0400. For each candidate it sendsPA_ACTION ACTION=11 PC=666to arm the eboard measurement, thenSET_PRESSURE_ADVANCE ADVANCE=<candidate>. - The carriage starts each candidate at X40 and a Y position from 50 to 80
in 5 mm steps. It extrudes across six X strokes ending at X60, X100, X120,
X140, X180, and X200. The X and Y movements don't actually happen and get discarded, this is mostly to trick
Klippy into thinking PA can be used. The short strokes extrude 1.13573 mm of filament at
F1080(18 mm/s); the long strokes extrude 2.27146 mm atF10980(183 mm/s). Alternating slow and fast motion creates the motor-load transient that the eboard examines. - The host sends
PA_ACTION ACTION=0 PC=666, waits withM400, and readsPA_GET. It treats a returned value of9as a pass for that candidate.
The eboard firmware's pa_action handler resets its result and sample area
when action 11 starts a measurement, switches its acquisition mode, then
finalizes the capture when action 0 arrives. get_emcu_pa_value reports the
result back to the host as pa_value value=<number>. 9 means "pass"; it
isn't the measured pressure advance. How the eboard decides is described
below. The host always sends PC=666, and
what that value means isn't known yet.
Where the waveform comes from
The host does not synthesize an electrical waveform. It commands a sequence
of extruder moves. Changing extrusion speed changes the motor's mechanical
load; the TMC2209 turns that load into successive SG_RESULT register values.
The eboard reads those values over UART and stores valid replies in time
order. Plotting sample index against SG_RESULT produces the waveform that
the classifier examines. Consecutive samples are roughly 2 ms apart when no
reply is lost; dropped replies make sample index an imperfect time axis. It is
a driver load estimate, not a direct motor current measurement or a
measurement of deposited plastic.
In the current OpenCreator/Kalico bucket test, the carriage stays at the purge bucket while E alone runs through six relative extrusion moves:
| Segment | Filament commanded | Default E speed | Nominal time at speed |
|---|---|---|---|
| Slow | 1.13573 mm | 4.5 mm/s | 252 ms |
| Fast | 2.27146 mm | 22.875 mm/s | 99 ms |
| Slow | 1.13573 mm | 4.5 mm/s | 252 ms |
| Slow | 1.13573 mm | 4.5 mm/s | 252 ms |
| Fast | 2.27146 mm | 22.875 mm/s | 99 ms |
| Slow | 1.13573 mm | 4.5 mm/s | 252 ms |
Those durations are distance divided by speed, not exact captured pulse
widths: acceleration, motion planning, and transitions between moves alter
the actual timing. The test commands 9.08584 mm of filament per candidate.
PA_ACTION ACTION=11 starts sampling before the moves; M400 drains them,
and PA_ACTION ACTION=0 closes the capture. The eboard polls the driver about
every 2 ms, accepts only complete replies with a valid CRC, and reserves 2,000
sample slots (about four seconds). Missing or invalid replies are not valid
load observations.
Current limitation: Kalico's extruder planner applies pressure advance
only when an extrusion move also has X or Y travel. These bucket strokes are
E-only, so changing SET_PRESSURE_ADVANCE between candidates does not itself
reshape their E motion. A pass currently shows that the driver-load waveform
matches the eboard's stroke criteria; it does not prove that the selected
pressure-advance value is optimal. The factory routine issues XY/E strokes,
whereas the current bucket-safe port intentionally omits XY movement. The
stock firmware's full waveform and its PA discrimination have not been
established by this Kalico implementation alone.
How the eboard judges a stroke
This is how OpenCreator's own eboard firmware (in Kalico, src/c5_eboard_pa.c)
does it.
Sampling. While a measurement runs, the eboard asks the extruder's TMC2209
driver for its load reading (SG_RESULT) about every 2 ms, roughly 500 times
a second. The response parser checks its framing and CRC before storing a
reading.
Judging. In those readings the eboard looks for a stroke:
- Start: the reading climbs by more than 99 without dropping.
- End: the reading stays at 70 or below for 0.4 s (or the readings run out).
- Plateau: the part above 150, minus 60 ms at each end.
The stroke passes when all of these are true:
- The plateau averages more than 150.
- The plateau lasts about 160–300 ms, roughly one slow stroke.
- Early in the stroke the reading jumps more than 20% above the plateau, for at least 3 readings.
- At the end it drops cleanly, from between half and all of the plateau level down to near zero.
If any stroke passes, the eboard answers 9.
What can make it fail
- Klipper talking to the same driver. Klipper checks the extruder driver about once a second over the same wire, which garbles the eboard's readings and stops the test from ever passing. OpenCreator's flow test now pauses those checks while it runs.
- No X/Y motion. Klipper only applies pressure advance to moves that include X or Y motion, so extruding in place tests nothing. Like the stock firmware, OpenCreator runs the stock X/Y strokes, but with the X/Y motors held still: they stay powered and locked, they just aren't sent any steps. The nozzle stays over the bucket, and afterwards the printer knows exactly where it is again, so no re-homing is needed.
- Driver mode. The TMC2209 only gives a useful
SG_RESULTin its quiet StealthChop mode, so OpenCreator runs the extruder driver in StealthChop (stealthchop_threshold: 999999on[tmc2209 extruder]to[tmc2209 extruder3]). Klipper's default would be SpreadCycle. On stock firmware the eboard sets up the driver itself, so the stock config has no driver settings to compare with.
To see the driver settings the stock eboard uses, run
DUMP_TMC STEPPER=extruder in the console of a printer still on stock
firmware.
How it chooses and applies a result
One pass tests up to seven candidates and keeps the smallest candidate
for which the eboard returned 9. The host allows up to five passes, stopping
once three passes produce a valid candidate. It averages those three selected
values to produce that tool's result. If fewer than three passes succeed, the
test reports failure rather than producing a new value. The routine also
cleans up its motor-driver test mode after completion or interruption.
After preparing the tools, the print-start code sends SET_PA_ADVANCE with
the successful T0–T3 results and ENABLE=1. Entries without a result are
filled with 99.0 as placeholders. If flow testing is off, or no valid tool
result is available, it sends SET_PA_ADVANCE T0=99.0 T1=99.0 T2=99.0
T3=99.0 ENABLE=0. These final per-tool settings are distinct from the
temporary SET_PRESSURE_ADVANCE candidate applied during each test.
Host pressure-advance test (OpenCreator, experimental)
C5_FLOW_STROKES METHOD=host is OpenCreator's own pressure-advance test. The
stock test only says whether each fixed candidate passes or fails. This one
has Klippy look at every driver reading itself and work out the pressure
advance, so it isn't limited to the stock candidates. It takes about a minute
per tool, where the stock test takes about two and a half.
It needs OpenCreator's eboard firmware with the reading stream (flashed by installer 0.4.8 and later), and StealthChop on the extruder drivers, the same as the stock test.
At print start it runs when the host_pressure_advance switch is on (Fans &
Outputs, C5_MISC_HOST_PRESSURE_ADVANCE_ON/_OFF, or HOST_PRESSURE_ADVANCE=1
on C5_PRINT_START), with APPLY=1. It is off by default and separate from
the stock flow_calibration switch. With both on, the stock test runs first
and the host test after it; if the host result is rejected, the stock value
stays.
The idea
Pressure advance models nozzle pressure as trailing the extruder motor. The right advance is the one that cancels that lag: by the time the motor reaches a steady speed, pressure has already caught up.
So the test runs the extruder fast at a constant speed and watches the motor's
load (SG_RESULT) during that steady part:
- Too little advance: pressure is still building, so the load keeps rising.
- Too much advance: the extra push overshoots, so the load falls back.
- Right advance: the load stays flat.
Because the motor speed isn't changing during that part, a change in load can only come from the melt pressure. The test measures this drift at a few advance values and finds where it crosses zero.
Readings
The stock eboard firmware only keeps its readings to make its own pass/fail
decision. OpenCreator's eboard firmware also keeps each reading with the
eboard's clock time, and Klippy downloads them afterwards (get_pa_stream).
That's about 500 readings a second, up to 6,000 (12 s) per run. Each one is
matched to the extruder's commanded position and speed at that moment.
Without that firmware, SENSOR=sg has Klippy poll the driver itself instead,
which gives far fewer readings.
The strokes
Each run starts with 0.4 s at 1 mm/s of filament, then six strokes. Each stroke is 0.5 s at 10.4 mm/s, then 0.4 s back at 1 mm/s. As in the stock test, the X/Y motors are held still, and each move has X/Y travel four times its extrusion so Klipper applies pressure advance to it. The first stroke is only a warm-up and isn't scored.
Scoring a stroke
Every stroke is measured from the moment it reaches speed:
- Early: 0.03–0.09 s in, just after the advance's own push has finished.
- Late: the rest of the stroke, up to 0.02 s before it ends.
The stroke's drift is (early − late) / late.
The motor's load reading also ripples with each electrical cycle of the motor: once every four full steps, which is 0.0589 mm of filament on these extruders. That ripple was more than half of the reading noise during a stroke. The test fits it across all of a run's strokes (four harmonics) and removes it before it compares early and late.
Finding the answer
- The test runs at advances of 0, 0.05 and 0.10, which gives 15 scored strokes.
- It fits a straight line through (advance, drift) and takes the advance where the line crosses zero. A stroke whose reading drops to 0 or near it stalled the motor and isn't used.
- Now and then a stroke reads far off. Up to a tenth of the strokes that sit more than four robust standard deviations off the line are dropped, and the line is fitted again.
- If the load barely responds (|t| below 4), the test runs the same advances again, up to 24 runs in all. PLA needs this: its pressure settles within about 20 ms, so each stroke shows only a small drift.
- The fit gives a 95% range for the answer. If that range is wider than 0.03, the test runs twice more, at the answer ±0.01. It repeats this until the range is narrow enough, or until it has used six runs on this, the same as a normal nine-run test.
The answer is rejected, and nothing is changed, when:
| Reason | Meaning |
|---|---|
| Load does not respond | The drift barely changes with advance (|t| below 4). Usually the driver isn't in StealthChop. |
| Drifts the wrong way | Drift rises with advance, the opposite of what pressure does. |
| Outside the tested range | The answer is more than 0.02 outside the advances that were tested. |
| Too uncertain | The 95% range is still wider than 0.03 after nine runs. |
The trace is written to /tmp/c5_flow_T<tool>.csv (one row per reading:
run, advance, time, filament position, reading, commanded speed and
acceleration). The console shows each stroke's drift and the result, for
example:
Parameters
| Parameter | Default | |
|---|---|---|
APPLY |
0 |
1 sets the result as the tool's pressure advance if it isn't rejected |
ADVANCES |
0,0.05,0.10 |
Advances for the first runs, comma separated |
REFINE |
1 |
0 skips the extra runs |
MAX_RUNS |
9 |
Limit on runs, including the extra ones |
WEAK_RUNS |
24 |
Limit on runs when the load barely responds; 0 turns the repeats off |
CURRENT |
1 |
Experimental: extruder run current during the strokes, as a fraction of the configured one. Lower makes pressure show up more, but noise grows as fast. Below about 0.8 the advance's push stalls the motor: on PETG this left too few strokes at PA 0.10 and gave 0.058 instead of about 0.075. |
SENSOR |
eboard |
eboard: the eboard's reading stream; sg: Klippy polls the driver (used when the eboard firmware has no stream) |
FAST |
10.4 |
Stroke speed, mm/s of filament |
SLOW |
1 |
Speed between strokes, mm/s of filament |
STROKES |
6 |
Strokes per run |
FAST_TIME |
0.5 |
Stroke length, s |
SLOW_TIME |
0.4 |
Time between strokes, s |
LEAD |
0.4 |
Slow time before the first stroke, s |
RATIO |
0.25 |
Filament per mm of the (held) X/Y travel |
The tool must be attached and at printing temperature, with Z calibrated, as for the stock test.
Results so far
On T2 with PETG at 255 °C, five runs gave 0.067, 0.068, 0.074, 0.075 and 0.079 (one of these was rejected as too uncertain, before the extra runs were added). The others took under a minute each. The stock test gives 0.028–0.030 for the same filament.
The stock test is limited by the motion more than by the filament. Its end check fails above about 0.037 because the retract outruns the stroke's own speed, and its spike check needs at least about 0.02. That leaves about 0.03 for most filaments.
Neither number has been checked against a print yet, so leave APPLY at 0
until it has. To check, print a pressure-advance tower with the same filament:
Then compare the height where the corners look best with both results.
Filament dryer (VDS)
On the SoC install, OpenCreator drives FlashForge's two-chamber VDS filament dryer the same way the stock
firmware does: over the printer's internal serial port /dev/ttyS3 at 115200 baud. Plug the dryer in where
FlashForge says to before installing: the installer only turns the dryer controls on when a dryer answers.
It then writes printer.accessory.dryer.cfg, which loads printer.dryer.cfg. If you add a dryer later, rerun the
installer or add [include printer.dryer.cfg] to printer.cfg yourself.
| Command | What it does |
|---|---|
C5_DRYER_START CHAMBER=A\|B\|AB TEMP=45-85 HOURS=1-48 |
Dry one or both chambers (MINUTES=60-2880 works instead of HOURS) |
C5_DRYER_STOP CHAMBER=A\|B\|AB |
Stop drying |
C5_DRYER_PAUSE CHAMBER=A\|B\|AB |
Turn the heaters off; start again with C5_DRYER_START |
C5_DRYER_DEHUMIDIFY CHAMBER=A\|B\|AB ENABLE=0\|1 |
Keep a chamber dry after drying |
C5_DRYER_STATUS |
Firmware version, and each chamber's state, temperature, humidity and time left |
C5_DRYER_PLA, C5_DRYER_PETG, C5_DRYER_ABS, C5_DRYER_OFF |
Presets (50, 65 and 80 °C for 6 hours) and stop; add CHAMBER=A or B for one chamber |
CHAMBER defaults to both. The chambers also show up as the temperature sensors dryer_a and dryer_b,
with their humidity, so Fluidd and Mainsail graph them. Macros can read printer.creator5_dryer
(connected, firmware_version, and per chamber drying, temperature, humidity, remaining_minutes).
The dryer's own firmware limits drying to 45-85 °C and 1-48 hours. OpenCreator doesn't update the dryer's
firmware; if C5_DRYER_STATUS says it is in its bootloader, update it from stock FlashForge firmware.
Offset Calibration
Offset calibration aligns the nozzles of T0–T3 for printing. It is separate
from locating their docks. The Creator 5 port exposes it through
C5_CALIBRATE_OFFSETS; measurements and the levelboard reference are kept in
/usr/data/firmwareRes/config/extruder.json.
Calibration cannot run during a print. If a tool is attached, the carriage first raises it to the safe Z clearance and docks it. The ordinary calibration pin is then probed at two known locations. Their contact-height difference is used to reject a plate that may still be installed and to set a safe approach floor for the following measurements.
With the carriage bare, the routine contacts the levelboard fixture to establish its Z reference, then scans outward from its center for the X+, Y+, X-, and Y- edges. Each edge scan is limited to 7 mm; opposite edges give the fixture's X/Y center. The routine then picks up T0, probes its Z against the fixture, scans its four X/Y edges, raises clear of the fixture, and docks it. It repeats that sequence for T1, T2, and T3. The saved X/Y printing offsets are each tool's measured center relative to T0. Its nozzle Z offset uses the tool's measured Z relative to the fixture reference, plus the separate per-tool Z fine adjustment. The code rejects measurements beyond its configured correction limits or an unsafe resulting nozzle Z offset.
CFW
The all-tool run saves only after all four tools succeed. It makes a backup
of extruder.json and replaces that file atomically, so a failed tool does
not leave a partially saved set. The measured offsets are also applied to
the active tool through Klipper's G-code offset when it is selected.
A single tool can be recalibrated with TOOL=0 through TOOL=3. It still
requires removing and checking the build plate; it docks any attached tool,
checks the ordinary pin, and automatically picks up the requested tool.
LEVELBOARD=0 skips refreshing the bare fixture reference for a single
tool, but does not skip that tool's levelboard measurement. Z=0 performs
XY-only calibration and needs a configured scan height or SCAN_Z; the
default Z=1 probes the nozzle Z automatically. TOOL=ALL always refreshes
the fixture reference and requires Z=1.
Baby stepping
Baby stepping a tool's Z offset during a print, from Fluidd's or Mainsail's
Z adjust buttons or SET_GCODE_OFFSET Z_ADJUST=, is saved as you go. It's
saved as that tool's Z adjustment in /usr/data/firmwareRes/config/zoffset.json,
the same value the touchscreen's Z offset sets. Each nozzle keeps its own
value: a step goes to whichever head is attached. The next print, and the same
nozzle after a toolchange, start from it, read from that file each time, so
it's kept across restarts too.
| Macro | What it does |
|---|---|
LIST_BABYSTEP |
Shows the saved Z adjustment for every tool. TOOL=2 shows only T2. |
CLEAR_BABYSTEP TOOL=1 |
Resets T1's saved Z adjustment to 0. With no TOOL, or TOOL=ALL, it resets all four. |
Clearing the attached tool also takes the adjustment off its current Z offset. Because the touchscreen uses the same value, clearing a tool also clears its touchscreen Z offset.
A Z change of more than 1 mm at once isn't treated as baby stepping and isn't
saved. To stop saving baby stepping, add persist_babystep: False to
[creator5_toolchanger].
Toolhead Dock Calibration
Toolhead dock calibration, called Extruder Position Calibrate in the
factory UI, finds the physical pickup/docking X/Y coordinates for one tool.
It does not change the nozzle offsets used to align layers during a
print. In the Creator 5 port, run C5_CALIBRATE_TOOL_POSITION T=0 through
T=3, or use the underlying EXTRUDER_POSITION_CALIBRATE T=n command.
Before starting, park all four tools, home the printer, raise Z to at least the configured safe clearance (10 mm in the supplied config), and let every toolhead cool below 50 °C. A print must not be active. The build plate does not need to be removed for this calibration.
- The routine disables X/Y motors and asks you to move the bare master carriage by hand to the chosen parked tool. It waits for both that dock's holder sensor and its grab sensor to register contact.
- Once contact is detected, it asks you to release the carriage and waits briefly before taking over. It latches the tool and pulls it clear, checking that the holder sensor released while the grab sensor remains active.
- It measures X and Y against the printer's X/Y home references, calculates the dock coordinates, and rejects a correction beyond the configured limit (2 mm in the supplied config).
- It rehomes X/Y, redocks the tool using the measured coordinates, and only
then saves them as
x_check_pos/y_check_posfor T0, or the corresponding numbered keys for T1–T3, inextruder.json. A timestamped backup is made first.
If contact, sensor verification, measurement, or redocking fails, the routine does not save new dock coordinates.
Mainboard and power supply fans
The mainboard has two fans of its own: one cooling the board and the X/Y/Z motor drivers, and one in the power supply. Stock runs both at full speed whenever the motors are powered or a hotend is heating. OpenCreator only runs them as fast as the printer needs, so they are much quieter most of the time.
- Mainboard fan: follows the mainboard chip's own temperature. Off below 54.5 °C, from 30% at 54.5 °C up to full speed at 65 °C, and at least 40% while the motors are powered, for the drivers.
- Power supply fan: follows the power supply's estimated load, from the hotends' heater power and the motors. 30% at light load, at least 50% while a hotend is heating, full speed at about 120 W. It never runs slower than the mainboard fan. Once the load is gone it keeps running for a minute at most 80%, then stops.
Both ramp up and down smoothly instead of switching between off and full. They are checked every second on their own timer, so long commands such as PID calibration, heat-up waits or homing don't stop them.
During input shaper, VFA and ripple calibration both fans are held at 50%, so their vibration stays the same through the measurement.
C5_BOARD_FANS shows both speeds, the mainboard temperature and the
estimated load. C5_BOARD_FANS HOLD=0.5 holds both fans at 50% (HOLD=-1
releases them), and any setting can be changed until the next restart, e.g.
C5_BOARD_FANS MAX_TEMP=65. To keep a change, edit [c5_board_fans] in
printer.base.cfg.
MCU temperatures
Fluidd and Mainsail show the temperature of the mainboard chip
(mainboard_mcu) and of the toolhead board's chip (toolhead_mcu). They are
only for keeping an eye on things; the mainboard one also drives the
mainboard fan.
Motion guard
The motion guard watches the X, Y and Z motors for skipped steps and stalls
during a print, from the mainboard's own motor control. It is off by default,
as it reported too many false alarms while the motors were crawling or
holding still. C5_MOTION_GUARD ENABLE=1 turns it on until the next restart
(ACTION=pause to pause the print instead of warning), and
C5_MOTION_STATUS shows what it has counted.